Naked Buskers in Times Square

Times Square is the heaviest populated tourist area in the world. It draws approximately 39 million visitors annually. Most come to gawk at the giant billboards and the neon and LED-lighted ads, but a lot more come to take their photos with one of the naked buskers who roam the area. 

Times Square near rush hour on last Friday was a slow-moving sea of people who clogged the sidewalk making locals rushing to catch buses and subways do detours into the street just to get round them. That’s the Times Square I was prepared for. I wasn’t expecting to see so many street performers but I should have known. The unusually balmy October afternoon drew almost everyone outdoors.

I spotted Elmo, the giant Statue of Liberty, the Transformer Robot, and several naked buskers. Everyone knows about the Naked Cowboy, the granddaddy of the naked buskers who strolls around Times Square entertaining visitors and locals in his cowboy hat, cowboy boots, tidy whities, and his guitar placed strategically so that it gives the impression that he’s nude.

The Naked Cowboy also has his naked cowgirls, though I didn’t see any. Who I did see, and dubious pleasure of meeting, was $andy Kane, the Naked Cowgirl.

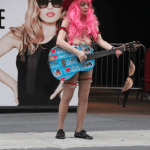
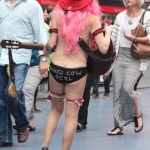
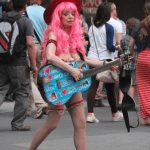
Kane, a former stripper, who looks more like someone’s great-grandmother than a naked busker, has played the Naked Cowgirl for about 6 years. She parades around Times Square, her red cowboy hat covering flowing pink hair, the bottom half of black bikini, pasties affixed to her sagging breasts, garter belts, and flats. A gold-studded bra that looks like it supported someone far more buxom, hangs from her guitar. I don’t remember hearing her actually play.

Kane offered to pose but I told her I only had $1 left. She did anyway. When I downloaded the photo, I noticed she’d given the finger, two actually. But it wasn’t personal, that’s part of Kane’s act, probably from her stripper days.

The Naked Indian and The Naked Cowboy share a moment

I must have picked the right place (Broadway and 45th Street) to sit as I saw not just one, but two Naked Cowboys. I also saw the Naked Indian, Adam David. David, who’s been operating as the Naked Indian for a little more than a year, recently settled a dispute with the Naked Cowboy over the name. Robert John Burck, aka the Naked Cowboy, holds a trademark and each cowboy pays a franchise fee.

Women were gladly lining up to have their photos taken with the Naked Indian and the Naked Cowboy, and get a chance to squeeze each of their buns. No, I took no photos of that silly spectacle.

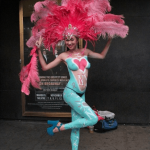
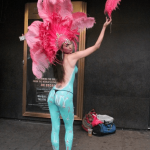
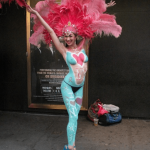
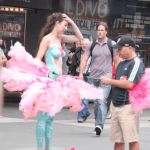
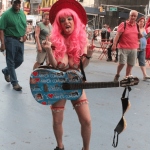
The most popular character on Friday was the Showgirl. Men followed her every provocative pose. For $5, you get to take a photo with her. I’ve forgotten now what she said her name is – but when I think of her, I think Jade. If you look closely, you’ll notice that her costume’s painted on. Two guys were with her, one collected the money – she’s got no pockets – and another stood close by, I guess as a bodyguard.

When I told my friends about the female naked buskers I’d seen in Times Square, they wanted to know how they were allowed to perform nearly nude.  According to a New York law, full nudity in public is legal if it’s part of a performance or play.

Street performers are also protected under the First Amendment. They are free to stroll Times Square and to work for tips from $2 to $5 taking photos but they’re not allowed to demand money, sell merchandise or block traffic.

Buskers, naked and clothed, can take home $50-70 a day, others like the Naked Cowboy who’s considered the #1 tourist attraction in New York City, can take home much more.

Interestingly, according to Wikipedia, Times Square, which is 1% of New York City’s total land size, generates 11% of the city’s economic output and 10% of the jobs. Since 2007, economic growth in this iconic area that lies between Broadway and Seventh Avenue and stretches from 42nd to 47th Street, outpaced the city’s by 13% during the same period.

Managing Solo Travel Fears

For people like me, who’re a little shy, solo travel can be unnerving. I’ve been traveling for nearly all my life but hadn’t, until about two years ago, traveled on my own.

I was on a three-week mercy mission in London and decided, at the last minute, to treat myself to a short vacation in Paris before I flew home. Thinking about it now, I must have been out of my mind to pick Paris, the city of love, for my first solo travel experience. However, it turned out to be the perfect place to wet my feet in solo travel.

But I wasn’t thinking about that as I boarded the Eurostar that Thursday morning. Doubts dampened the excitement I felt and tugged at the edge of my mind like insistent children, waiting for reassurance. And as the train moved away from London’s St. Pancras Station, old fears tightened like a band around my stomach. The more I tried to ignore them, the more they clutched until finally, I decided to look each one straight in the eye.

Getting lost: Getting lost was a fear I hoped Paris would help me conquer. I’ve gotten lost so many times, my friends generously describe me as ‘directionally challenged.’ My most embarrassing experience was missing my exit and getting lost five minutes from home. It took more than 20 frustrating minutes to find my way. The worst part was, I could see the top of our apartment building almost the entire time I was driving around.

Eating alone: Having people, especially family and friends, at the table can turn a meal into a celebration of life and love. I was terrified just thinking about having a meal in a restaurant by myself. My fear was heightened because I knew no one in Paris who I could call to rescue me.

Sleeping alone in an unfamiliar environment: This was, by far, my biggest fear. I don’t rest well when I’m in a new environment, and my anxieties increase when I’m alone. Looking this squarely in the eye as the train took me closer to Paris did little to calm my nerves. But I was determined not to let this fear paralyze me.

Even though, intellectually, I felt that I had dealt with the fears that plagued me, I was still feeling a bit unsure. When the train came to a stop at Paris’ Gare du Nord, I took a deep breath, drawing on my inner reserves for the courage I knew I lacked.

As I exited the station and headed for the taxi stand, shouts of Taxi! spoken with a different inflection flew like darts past me. French was everywhere; then it hit me: This is Paris.

A smile lit up my face as my taxi arrived. I chatted with the driver about work, football, and politics. Oui, je peux le faire! I can do this.

I didn’t let fear shackle me. I went wherever I wanted and never got lost even when I returned to the hotel past midnight.

My steps were uncertain as I walked into my first restaurant, solo. The hostess showed me to a table but as I waited for my server to arrive, I gave in to my fears and walked out. I laughed at myself as I walked away because I knew I’d have to face this fear. Two days later, I tried again. This time, I stayed. My waitress was friendly and by the end of the meal, I had made friends.

That first night in my hotel room by myself, I put the chair under the door handle for my peace of mind. It took a while before I slept but when I woke the next morning, I felt refreshed and ready to explore Paris.

I returned to London five days later, feeling a boost of confident I never had when I left. My solo travel had emboldened me in ways I couldn’t have envisioned. I don’t have another solo trip planned but I can’t wait to see what I’ll discover about myself on the next one.


[inlinkz_linkup id=325275 mode=1 pageSize=300]

New York City Skyline

Each city has its own unique skyline and New York City is no different. With skyscrapers that soar to dizzying heights and in different colors and shapes, from a distance, they look almost like they were taken from a pop-up book.

I remember the first time I heard the word skyscrapers. I might have been about 11 then. I could never, not in my wildest dreams anyway, have imagined buildings so tall. When I saw them a few years later, my eyes searched the sky trying to find the top floors.

New York City Skyline
Pop-up-book-style view of Manhattan from Governors Island ferry

New York City has, a various times, had some of the tallest buildings in the US as well as the world. The Empire State Building, at 1,250 feet, was the tallest building in the US when it was completed in the 1930s.

The Trump Building or 40 Wall Street was the tallest building in the world for two months until the completion of the Chrysler Building.

The Art Deco style Chrysler Building, 1,046 feet, was the tallest man-made structure in the world from 1930-31. It is the 50th tallest building in the world.

It’s hard to imagine that the Metropolitan Life Tower, which is only 700 feet, was the tallest building in the world for 4 years until the Woolworth Building was built in 1913. It took a mere 92 feet for the Woolworth to claim the title of tallest building in the world. And it held on to it for 17 years.

All these skyscrapers in New York City and the country have now been eclipsed by One World Trade Center, which you can see on the left in the photo above. It stands at 1,776 feet and is the fourth tallest building in the world.

By far the best way to appreciate the height and beauty of New York City’s skyscrapers is from a distance. My favorite places to view them are from the waterways and islands around Manhattan. Some locations in Brooklyn and New Jersey, especially those that line the coastline, aren’t bad either.


Linking up with Travel Photo Thursday, that Nancie at Budget Travelers Sandbox organizes. Be sure to head over and check out more photos from locations around the world.


Auntie Birdie’s Pepperpot Soup

Traditions, such as how to prepare certain meals are generally passed from mother to daughter, the older women in the family to the younger ones. Though a very talented cook and baker, my mother never taught me how to cook.

By the time I was old enough to start learning, she’d passed the responsibility for preparing meals on to our helper, going into the kitchen only at Christmas to bake or when we expected company. Then she’d create elaborate meals, which were, of course, well beyond our helper’s capabilities.

Somehow, though, cooking came to me naturally — I can fix just about any meal. But when I decided to feature pepperpot soup for FoodieTuesday, I realized that I didn’t know how to make it.

Sure, I could have used a recipe from one of my cookbooks but that just wouldn’t do, not for pepperpot soup. Knowing how to make it made me think of those family traditions. So I emailed my sister and aunt. I wanted a recipe I knew someone in the family had used.

Auntie Birdie's Pepperpot Soup
A delicious, nutritious soup even George Washington liked.


Write a review

Print

Ingredients
  1. 1/2 lb. smoked or corned pork, pig's tail or salt beef, chopped in small pieces
  2. 1/2 lb. fresh beef (boneless, cubes)
  3. 3 cloves chopped garlic
  4. 1 onion (chopped)
  5. 6 cups water
  6. ½ lb. yellow (or other yam), 1 lb. cocoa or (2 medium green plantains peeled and chopped)
  7. 1/2 lb. cream of coconut (or 1 can coconut milk)
  8. 2 cups okra
  9. 1 hot pepper (Scotch bonnet pepper, chopped)
  10. 1/2 red pepper (sweet, chopped)
  11. 1 lb. callaloo/spinach, chopped
  12. ½ lb. cabbage chopped
  13. ½ lb. kale or mustard greens chopped
  14. 1lb flour (1/2 plain and ½ whole wheat) for dumplings
  15. Salt and black pepper, to taste
  16. 2 bay leaves
  17. 11/2 tsp. thyme (ground)
  18. 4 stalks escallions (chopped)
  19. 4 pinches nutmeg
Instructions
  1. In a large stockpot, add pork with a teaspoon of oil.
  2. Braise on medium heat to remove fat drippings.
  3. Pat the beef cubes dry.
  4. When enough drippings have been released, add the beef and sauté until brown.
  5. Add 6 cups of water, cover and let simmer for an hour. Skim off any foam that rises on the top and sides of the pot.
  6. Check meats for doneness then add all greens, including okra. Cook for ½ hour.
  7. Remove greens and puree in blender or food processor.
  8. Return pureed greens to pot. Add chopped onions, yam, coco, bay leaves, coconut, sweet pepper, beans and spices.
  9. Make spinners and add.
  10. Add scallions and other seasonings.
  11. Check taste and add a tablespoon of butter.
  12. Cook for another 15 minutes.
  13. Add shrimp during the last few minutes of cooking
  14. Spoon into a bowl, garnish with shrimp.
  15. Serve hot with rolls, slices of hard dough or other bread.
Notes
  1. Turkey or chicken can be substituted, or left out all together for a meatless soup.
  2. Meats can be pressure cooked.
InsideJourneys https://insidejourneys.com/

Pepperpot soup is made primarily callaloo, a leafy green vegetable that’s a close cousin to spinach, as well as taro leaves, kale and okra – though any green, or combination of, will do.

This mix of vegetables, meat and pepper, lots of it, make pepperpot a delicious and nutritious meal. So nutritious that George Washington had his cook prepare it for his troops. According to a post on Chef Walter Staib’s, A Taste of History, Washington was introduced to a version of the soup when he visited his brother, Lawrence, in Barbados in 1751.

When my aunt emailed me a recipe appropriately called, Aunt Birdie’s Pepperpot Soup, I wrote back immediately.  The recipe, she said, was similar to how she remembers the pepperpot soup that was made in her mother’s kitchen in rural Jamaica.

I knew right away that I wanted her to show me how to make it. I wanted to learn from someone who knew.

Auntie Birdie, my father’s youngest sister, is an accountant and fabulous cook who always shares stories about growing up “in the country,” as most Jamaicans call any place outside Kingston.

As she chopped the greens, Auntie Birdie, who was named after one of her mother’s sisters, reminisced. It certainly feels like life was simpler then, family life idyllic, the foods sweeter.

Most people cooked on a wood fire in a kitchen that was separate from the house, Auntie Birdie recalled. There was no refrigeration then so meats, primarily pork and beef, were cured, or smoked. The meat would be seasoned with pimento leaves and placed on a mesh, called a kreng kreng which hung over the fire. As meals were cooked with pimento woods, the smoke would slowly baste the meats and lock in the flavors. This smoked meat, along with a small amount of fresh beef, would be used in the pepperpot soup.

Auntie Birdie with her pepper tree
Aunt Birdie with the tree that supplied the peppers for the soup

With my aunt and I working together, the pepperpot soup took two hours from preparation to table. The meat would have taken the longest to cook, but in this modern day kitchen, a pressure cooker reduced cooking time by more than half.

I had pepperpot soup last at the Pegasus Hotel in Kingston. It was the best pepperpot soup I’d had in a while. Auntie Birdie’s Pepperpot Soup made me go for seconds.


How to Join the FoodieTuesday Linkup

Join the FoodieTuesday linkup by –

  • Posting a foodie photo on your blog
  • Adding the link to your foodie post in the link tool at the bottom of this post
  • Leaving a comment
  • Tweeting this post using the hashtag #FoodieTuesday

Hope to see you at FoodieTuesday!

[inlinkz_linkup id=323992 mode=1 pageSize=300]

A Trip to Governors Island

Last weekend, I took the 5-minute ferry ride from Manhattan to Governors Island for Fête Paradiso. It was my first time visiting the island and I realized pretty quickly that I didn’t know much about it.

Governors Island is located about a half mile from the southern end or Lower Manhattan. The island is 172 acres, a mile long, and a quarter of a mile wide.

Governors Island ferry entrance
Governors Island

New York’s Native Americans had called the island Paggank or ‘Nut Island,’ for the number of oak, hickory and chestnut trees there. The Dutch also called it Nut Island but during the British colonial period it was reserved exclusively for use for New York’s royal governors and renamed Governors Island in 1784.

Governors Island served as a military base and Coast Guard installation for more than 200 years. During that time, it was off limits to the public.

There are three historic forts on the island. Two – Fort Jay and Castle Williams – were named National Monuments in 2001.

Governors Island became part of New York, legally, in 2003 when the federal government transferred the island to the City and State of New York. The City, through the Trust for Governors Island, is responsible for the operation, planning and redevelopment of the island.

Mayor Bloomberg, the current mayor, has earmarked $250 million to make Governors Island into a public open space with educational, not-for-profit, and commercial facilities.

Governors Island is open from Memorial Day to the end of September and hosts a variety of free artistic and cultural events during the season. In addition to Fête Paradiso, the day I went, there was an art exhibit in several of the historic houses on Nolan Row as well as handmade gifts and personal items like T-shirts, hats, scarves, etc., available for sale.

Governors Island is open to the public from 10:00 a.m. to 7:00 p.m. on Saturdays, Sundays and Holiday Mondays and private events such as weddings, family reunions, picnics, and corporate outings can be held there.

No alcohol can be taken to the island. However, alcohol can be purchased at designated areas. Barbequing, cooking and grilling are also not permitted.

Governors Island is accessible by ferry only; no private vehicles are allowed. Ferry service is available from Battery Maritime Building in Lower Manhattan and from Brooklyn and Queens.

Governors Island is a charming oasis with incredible views of Manhattan. It’s the perfect place to spend an afternoon bike riding, walking or just relaxing.

Linking up with Travel Photo Mondays which Noel at Travel Photo Discovery organizes.

Fete Paradiso on Governors Island

When I saw a tweet last Saturday about Fête Paradiso, I knew right away I had to experience it. Billed as the world’s first festival of vintage French carnival rides and carousels, it debuted on New York’s Governors Island in July and is coming to an end on September 29th. But I had plans though I had some flexibility on Sunday.

I was pretty excited as I left the house early Sunday morning. Riding the subway to the ferry that would take me to Governors Island, I tried to guess which of the other passengers – especially those with kids in tow – was on their way to the festival.

It was a beautiful morning with blue skies and brilliant sunshine, perfect for a day outdoors. The ferry ride from the westside of Manhattan to Governors Island lasted about 5 minutes, just long enough to ratchet up the excitement of the kids, young and young at heart, on board.

I didn’t know where on the island Fete Paradiso would be located – I doubt most people knew – but we fell into groups and followed the sound of the carnival music. Looking down, I noticed that horses had been drawn in different colors on the road. Like breadcrumbs, they pointed out the way and confirmed we were going in the right direction.

It was fun to see the different rides and the detailed work on these rare 19th and early 20th century museum-quality pieces. It was even more fun to hear the kids scream with the delight as they whizzed around on the rides, and watch the parents watch and photograph them.

I put down my camera long enough to take a ride on the bicycle carousel, the velocipede. One of the few carousels for adults and children, I had watched for a moment before deciding to take a ride. I felt like I was flying through the air as we pumped our legs furiously to keep up with the mechanical pedals. After a few minutes, though, my ankle couldn’t handle it so I propped up my foot and kept going until the ride was over. In all, it took about 3 delightful minutes.

Fete Paradiso's velocipede
On the velocipede

As I was leaving the velocipede, the attendant told me that it was created in the late 19th century to encourage Parisians to try out the bicycle, which was then the new transportation kid on the block. Considering how popular bicycles are now, it’s hard to imagine people had to be encouraged to ride but I can understand. Change is sometimes difficult to embrace. This velocipede is just one of two in the world; the other was featured in the film, Midnight in Paris. (I don’t remember seeing it so I’ve got to keep my eyes peeled next time. And now I can say I’ve been on one!)

The line for food, which was prepared specially for Fete Paradiso by the French bistro, Le Gamin, was several rows long but I wasn’t hungry so after my ride on the velocipede, I decided to leave.

Fete Paradiso enjoys its final run this weekend. It closes on Sunday, September 29th, so if you like carousels and rides and you’re in the New York City area, you should definitely not miss this.

Tickets to Fete Paradiso cost $3 per ride, $25 for 10. The ferry is free and leaves every 30 minutes from Manhattan’s Battery Marine Building on South and Whitehall Street. Ferry service is also available from Brooklyn. You can read more about Fete Paradiso here.


Linking up with Travel Photo Thursday, that Nancie at Budget Travelers Sandbox organizes. Be sure to head over and check out more photos from locations around the world.

Escoveitch Fish, Red Snapper

There are certain meals that every self-respecting Jamaican cook must know how to prepare, with his or her eyes closed, if need be. One such meal is escoveitch. Typically, escoveitch fish is reserved for fish but chicken can be used as well. I prefer fish – red snapper or king, but porgies or any type of fish that is suitable for frying can be used.

Escoveitch refers to a way of cooking, or more specifically marinating fish in a vinegar sauce. Also known as escabeche, it likely came to Jamaica by way of the Spanish.

Escoveitch fish is one of my favorite meals. It is also the only meal my mother taught me to make. I had picked up how to cook everything else, by osmosis I guess but was insecure about my escoveitch fish-making skills. Once I realized how simple it was, I made it over and over.

Escoveitch Fish


Write a review

Print

Ingredients
  1. 2 lbs. red snapper or king fish, cut is slices
  2. 2 tsp. freshly ground black pepper
  3. 1/2 tsp. whole black pepper
  4. 3 tsp. salt
  5. 1 medium Scotch bonnet pepper, cut in strips
  6. 2 large onions, sliced
  7. 1 tsp pimento berries
  8. 1/2 cup oil (for frying)
  9. 2 cups vinegar
  10. 2 limes or lemons
  11. 1 small chocho (chayote or christophene), cut in strips
  12. 1 small carrot, cut in strips
Instructions
  1. Clean fish and wash thoroughly in large bowl with water and lime juice mixture.
  2. Dry fish, place on paper towels to absorb any remaining liquid.
  3. Mix black pepper and salt.
  4. Rub the fish lightly on both sides and on inside with salt and black pepper mixture.
  5. Put on paper towels.
  6. Heat cooking oil in skillet and fry fish on both sides until crisp and golden brown, about 3-5 minutes.
  7. Place fried fish into a glass dish.
Marinade
  1. In a saucepan, add vinegar, onions, Scotch bonnet strips, pimento berries, chocho and carrot strips.
  2. Boil for 2-3 minutes then lower heat and let simmer until onions are soft.
  3. Remove and let cool.
  4. Pour marinade over fish and let cool overnight, or at least an hour. Marinating overnight allows the fish to absorb the flavors.
  5. Escoveitch fish can be served with a variety of starches - from rice to bammie (a cassava flat bread).
Notes
  1. Paper towels will keep the fish dry so that it doesn't pop when placed into the hot oil.
  2. Escoveitch fish can be made a day in advance.
InsideJourneys https://insidejourneys.com/

I’ve yet to try escoveitch chicken. I can’t imagine how chicken stands up to being marinated in vinegar, what the flavors will be like, but I’ll post a recipe once I give it a try.


Have a foodie post you’d like to share? Join the #FoodieTuesday linkup and add it here  –

  • Add the link to your foodie post in the link tool below.
  • As a courtesy, please include a link back to this post.
  • To make it a fun linkup, don’t forget to leave a comment here and comment on as many posts as you can.
  • If you Tweet, G+, Facebook use the hashtag #FoodieTuesday.


[inlinkz_linkup id=321145 mode=1 pageSize=300]

At the Jersey Skyline Wine Festival

Blue skies, with tufts of puffy clouds, and the New York skyline in the distance created the perfect backdrop for the inaugural Jersey Skyline Wine Festival which took place this past weekend at Overpeck Park in Ridgefield Park, New Jersey.

Jersey Skyline Wine Festival
Tents at the Jersey Wine Festival

My friends and I arrived at a little past 2 p.m. After we paid the entry fee, the attendant gave us each a wine glass etched with the New Jersey Wine Growers Association logo, a pencil and a list of the 13 participating wineries. They told us to hold on to our glasses as they would replace them only if they were broken and we had proof.

Jersey Skyline Wine Festival
At the wine festival

The wineries occupied tents on the edge of the large field; vendors selling a variety of products took up the tents in the middle. We moved from tent to tent, tasting several fruit-infused wines, varieties made from hybrid grapes and Chardonnays, Merlots, Pinot Grigios, Cabernets, Rieslings, and Shiraz.

By the time we got to the fourth tent, I could feel the wine was already going to my head and I realized I hadn’t eaten since breakfast. We headed to a stall for lunch. What we lacked here was variety in the offerings. It would also have been great to have food that matched the wines that were available. I ended up with something that called itself jambalaya which only filled the space in my stomach.

Jersey Skyline Wine Festival
Band at the wine festival

By now, the band had warmed up and when they started playing the Hall and Oates classic, Sarah Smile, my friend noticed a couple who had temporarily abandoned the tasting and were canoodling, first outside then under a tent. Blame the wine, the great weather and yes, the music.

Jersey Skyline Wine Festival
Tasting at Tomasello Winery

Stomachs now full, we resumed tasting at Tomasello Winery. I was intrigued by their Broomstick Brew and decided to try it. According to Tomasello’s description, Broomstick Brew is a blend of red wine and mulling spices, and is served warm. The winery’s server used something that looked like turkey baster to pour the wine into our glasses. Broomstick Brew is really mulled wine with a fancy name.

Jersey Skyline Wine Festival
My glass of Broomstick Brew

On our way out, my friend noticed a pepper vendor, Rosetta Farms and since we both love pepper, we headed over. I decided on a Chipotle Habanero mix that I can’t wait to try. Like the wines, it had several tasting notes – a bit salty at the beginning, flavorful in the middle and kick of pepper at the end.

Jersey Skyline Wine Festival
Pepper Vendor

The Jersey Skyline Wine Festival was a wonderful introduction to the varieties of wines produced in the Garden State. Although I don’t like fruity wines, I tasted strawberry, peach, blueberry, and apple but wasn’t bowled over by them. The varieties that were made from hybrid grapes like Vignoles, Chambourcin and Traminette that were produced here in the US were more to my liking. My other favorites were a Cabernet Franc, a Riesling 2010, a White Merlot, and a few of the desert wines. Even with all the notes I took, it was still hard for me to decide what to buy.

I’m looking forward to attending a few more wine festivals before the weather changes. If you’re a wine lover in the northeast, it’s a great time now to enjoy wines produced locally. All the wineries ship to other states as well. 


Linking this week with Travel Photo Mondays that Noel at Travel Photo Discovery organizes.


The Monkey Jar

The monkey jar has been used for several centuries in Jamaica and the Caribbean though no one knows the origin of the name. (There’s probably an interesting, perhaps even a funny story that could be inserted here.)

Monkey jar
Replica of a monkey jar

The technique used to make earthenware pieces, like the monkey jar was brought to the Caribbean by enslaved Africans. Once here, they adopted European, indigenous Indian and other local techniques that influenced form, function and manufacture.

Made of porous clay, with an oval-shaped body, flat base, a handle and an abbreviated spout, the monkey jar was used to carry and store water. Clay pots were used to keep water cool in the days when there were no refrigerators. Clay is still used today to keep water in communities that have no refrigeration.

Cooling jar
A large cooling jar (seen at Outameni)

Pottery-making is still practiced in Jamaica with local artists using clay that is found primarily in the northeast section of the country. The clay is mined by hand then transported out of the area. Traditional items like the yabba, a large earthenware bowl that first produced in Jamaica around 1692, are still being made. The yabba was usually handmade by women and are either by glazed or left unfinished.


A yabba was one of my first purchases after I returned to Jamaica. I’ve used it as a tureen and as a mixing bowl. (Will post a photo later.) The monkey jar above is a replica that I bought at the Hanover Museum last year. I’d love to find an old one for my collection.


This is my submission to Travel Photo Thursday, which is organized by Nancie at Budget Travelers Sandbox. Be sure to head over and check out more photos from locations around the world.


Red Pea Soup

Soup, especially red pea soup, is comfort food to me. I make it when it rains or snows, when it’s cold or when I need a pick-me-up. Sometimes, I make it just because.

I love soup. I love the convenience of it. Even cleanup is simple as there’s only one pot. The only thing to master about making soup, however, is timing. Too little and you end up with a broth; too much and you get something close to porridge. I like mine after the peas and potatoes have broken apart, giving the soup ‘body.’

Soup was a typical Saturday meal in our house. When the butcher brought fresh beef, we’d have beef soup. Otherwise, it’d be chicken, pig’s tail, corned beef, or a combination. And there was always some type of pea or bean – pigeon (or gungo), red, split, etc., vegetables, yam, potato and dumplings or spinners.

Red Pea Soup
Bubbling soup

Soups made from a variety of meats or vegetables are typically found on menus in restaurants, cook shops and street vendors. Expect to see corn, cow skin or foot, chicken foot, crayfish (or janga), fish (popularly called fish tea, not fish soup), pepperpot, etc. The star of any gathering, from weddings to wakes, is mannish water, which is also called goat soup or goat belly soup. It’s made from, you guessed it – goat, including the innards.

Red Pea Soup


Write a review

Print

Ingredients
  1. 1 or 2 cups peas (I love a lot of peas in my soups so I usually use 2 cups)
  2. 1 lb. beef or beef bones (or other meat - or leave out the meat for a meat-free soup)
  3. 1 or 2 medium carrots (chopped)
  4. 1 sprig of thyme
  5. 1 stalk of scallion
  6. 1 Scotch Bonnet pepper
  7. 1 tbsp. Pimento Berries
  8. 2 cloves garlic
  9. 1 large Irish potato (cut up in large chunks)
  10. 2 tbsp. coconut milk (optional)
  11. 2 sprigs Parsley (optional)
  12. 2 Bay leaves (optional)
  13. Water – enough to cover peas and meat
  14. Salt and freshly ground black pepper to taste
  15. Noodle soup (optional)
  16. Spinners (recipe follows)
Instructions
  1. Pick out defective or broken peas and wash. Soak overnight. The next day, drain off the water, pour peas into a stockpot, cover with cold water, add garlic and salt to taste and put to boil. (If you’re unable to soak peas overnight, wash, add enough cold water to cover and put to boil.)
  2. Wash meat and add to pot when water begins to boil.
  3. Cook for about an hour or until peas are soft.
  4. Add seasonings – pimento, scallion, Scotch Bonnet, black pepper, and coconut milk.
  5. Peel potato and carrots, chop and add to soup.
  6. Make spinners (recipe below) and add.
  7. Add thyme, parsley and Bay leaves (tie together with kitchen twine or put in cheesecloth). Cover and let cook for about an hour or until done.
  8. Remove Bay leaves, parsley, thyme and pimento beans before serving.
InsideJourneys https://insidejourneys.com/

Spinners (Dumplings)


Write a review

Print

Ingredients
  1. ½ cup flour
  2. 1 tsp salt
  3. 5 tbsp water
  4. 2 tsp butter (optional)
Instructions
  1. Combine butter with flour, blend thoroughly.
  2. Add salt.
  3. Add water slowly and mix until you have a doughy consistency.
  4. Break off small piece and roll between both hands to make the spinners.
  5. Each should be about 2 inches long. Place slowly into soup.
  6. Cover and let cook.
InsideJourneys https://insidejourneys.com/

Have a foodie post you’d like to share? Join the #FoodieTuesday party and add it here  –

  • Add the link to your foodie post in the link tool below.
  • As a courtesy, please include a link back to this post.
  • Leave a comment and do the same for the other posts.
  • If you Tweet, G+, Facebook use the hashtag #FoodieTuesday.


[inlinkz_linkup id=318770 mode=1 pageSize=300]